Pages

April 30, 2013

Teacher Appreciation Quote {Printable}

You may or may not know that next week is teacher appreciation week.  I always loved this week when I taught.  I loved teaching with or without recognition, but it sure did make all of us teachers feel extra special for a week.  I hope you'll take the time to do a little something for your child's teacher.  If you're not sure what to do, you could surely use today's printable, or I have another great (probably my all-time favorite) teacher printable you can find here.


My twins have been so blessed to have a wonderful kindergarten teacher this year (remember the homemade bread in a bag?).  They're so sad the year is almost over.  I thought of her as I typed this quote.  My boys love going to school, and they love learning.  I know that's because their teacher loves what she does.  It shows!  Thank you, Mrs. Kohler for making learning such a wonderful experience for my boys.  They will miss you, and are hoping little brother will get to be in your class someday.


Just for fun, here's a picture of my second year class on Halloween.  I can still name every single one of these darling first graders.  I haven't looked at this picture in quite sometime.  So many wonderful memories!

Click here to print today's printable. 
 Thanks so much for stopping by!  I hope you found a little something worth your time.

Linking up to these parties & Savvy Southern Style.

April 29, 2013

Roll-A-Leprechaun (Fun Family Game & Printable)

I know we're way past St. Patrick's Day, but I did this post over at Or So She Says in March, and haven't had a chance to put the entire post here at Blissful Roots.  Like I mention at the end of this post, you can easily adapt this game to fit any  holiday or time of year. 

I first "met" Mariel when she left a comment on my Roll-A-Christmas Tree post back in December.  I was first, thrilled she would even comment, and second excited to hear someone else liked the game, because we LOVE it at our house.  We love it so much that we've done Roll-A-Pumpkin (thanks to The Happy Home Fairy), Roll-A-Christmas Tree, Roll-A-Snowman, and now just in time for St. Patrick's Day, Roll-A-Leprechaun.


I love this game because the whole family can play, and it can be played over and over again.  The object of the game is to be the first player to complete his/her leprechaun.  The rules are just as stated on the page above.  You take turns rolling the dice, and follow the instructions according to which number you roll.  To play you'll need two dice, the leprechaun outline (thanks to Jennie at  Fun Learning At Home for the great template of the leprechaun body outline), markers, colored pencils, or crayons, and the instructions. 


Another fun aspect of this game comes in displaying the end product.  You could put them all together in a book to keep, frame them for a Leprechaun Wall of Fame, or simply attach them to a string with clothespins (like we did in the picture below).  My boys are extremely proud of their leprechauns and stop to admire them each time they pass by.

We played the game last week, and here's how our leprechaun's turned out.  Aren't they cute?  Can you tell whose is whose?  I love to watch the leprechauns take life throughout the game, and see the unique touches each person adds.


As I mentioned before, this game can be adapted for any holiday or occasion.  Easter's just around the corner.  See what you can come up with for Roll-A-Bunny, Egg, or Basket.  
I hope you found a little something worth your time  You can click here to print out the instructions, and here to print out the leprechaun outline page.  If you're in need of any other St. Patrick's Day activities, come visit me at  Blissful Roots.  I've been working on a Leprechaun Clue Book, and a Shades of Green color activity.  We'll see you in April here at Or So She Says, or stop by Blissful Roots anytime.  Happy St.Patrick's Day (a tad bit early)!

April 26, 2013

Nightstand Decor

Today's post is nice and short.  We have a big weekend here.  My sister-in-law is getting married, some of my family is coming to town for my sister's birthday, and a big soccer game (well, big for my six-year-old twins, and a proud mom).

I'm working on adding a bit of color and personality to my nightstand.  Here's a few pictures of what I have in the works.


I'll have the finished project ready to share next week.  I hope you have a wonderful weekend with beautiful weather (it's finally getting there for us here in Utah).

Thanks so much for stopping by!  I hope you found a little something worth your time.

Linking up to these parties & Savvy Southern Style.

April 25, 2013

Alison's Zinnia {Another Beautiful ABC Book}

So, I have a new look here at Blissful Roots.  I'm so happy with how it turned out!  I have to thank my patient, helpful husband for helping me get it all put together.  I'm still working on a few things, but we're off to a good start.  Anyway, on with today's post.

Remember these images from last Thursday's post

Source

 Well, I'm back with another great ABC book from the same illustrator, Anita Lobel.  I'm simply amazed with her illustrations.  The flowers in this book are stunning!  I just can't seem to get enough of flowers this time of year.  You should see my 'Flowers' Pinterest board.  I've been filling it up like crazy lately.  

Source

The book is called Alison's Zinnia, and I love this book not only for the illustrations, but for the clever wording as well.  Just take a look at these pictures!

Source
Source
Source

Somehow, this book (just like On Market Street) hasn't quite made it into my children's book collection yet.  Lucky for me, my husband was ordering some parts for his muffler on Amazon this past weekend, and needed to spend a bit more to get the free shipping.  Needless to say, I was more than happy to help him out in his dilemma.  I had him order Alison's Zinnia and On Market Street.  You can get them both on Amazon for about $6 each.  I can't wait for them to get here.  I've been loving the images on the computer, but holding the actual book is a lot better!

So, here's another book you can add to your library wish list.  Now if I could just have all of these flowers growing in my yard!
Thanks so much for stopping by!  I hope you found a little something worth your time.

Linking up to these parties & Savvy Southern Style.

April 24, 2013

Fresh Salsa {Ninja Edition}

We have had this salsa at our house for the past two nights in a row (a request from my six-year-old twins), and I think we could have it for another ten straight without getting sick of it.  


Honestly, my boys (even my three-year-old) gobble this right up.  They can't get enough of it, and I love how many great vegetable they're getting without really even knowing it.  My husband's also a fan.  I make a lot of dips, and I have to say this one might be one of his favorites.  Every time I make it he comments on how much he loves it.  You can't beat healthy, fresh, and crowd-pleasing for everyone (yes, I love it too) in the family, can you?

Source

You can use your food processor or blender for this.  I actually came across this recipe in my Ninja recipe book.  Do you have a Ninja?  Have you heard of the Ninja?  You've probably seen them on the TV infomercials before.  I have to say I didn't go out and buy one, but lucky for me, my mom did.  She gave me one several years ago, and now I'm on my third one.  Not because they've quit working, but my mom keeps buying the next model.  The Ninja in the picture above is the one I have now.  It's the Ninja Master Prep.  I LOVE this!  I have a food processor, and I do use it, but this is so small, quick, easy, and the clean up is a breeze.  We use it for this salsa, smoothies (it chops ice like a dream!), shakes, chopping veggies, and so much more.  (Apparently I'm my own infomercial.  I'll stop now.)


Here's the recipe (click on it to print your own).  It's very simple.  Easy ingredients, and with your Ninja (or any other chopping device) it really takes 3-4 pulses, and it's done!  You may want to double it if you're serving a large group.  My family of five easily finishes off one batch in one setting.

BTW, I just checked the Ninja website to see if this salsa recipe was there (it's not), but they have a bunch of others I can't wait to try.  Click here to check them out.

Thanks so much for stopping by!  I hope you found a little something worth your time.

Linking up to these parties & Savvy Southern Style.

April 23, 2013

The Earth Laughs In Flowers {Printable}

Have you seen the May issue of Country Living yet?  The cover is adorable!  I instantly fell in love with the giant chalkboard, the work space, the coloring- pretty much the whole thing!  After seeing it, I knew the exact color scheme for my next printable.

Source

Do you have flowers blooming where you live?  We have had a lot of daffodils, but the snow, and cold weather have been rough on them.  I sure do love the first flowers of spring!  

I found this quote several years ago, and when spring roll around I like to pull it out.  It makes me smile every time I read it.  


You can click on the quote to print out your own copy. Thanks so much for stopping by!  I hope you found a little something worth your time.

Linking up to these parties & Savvy Southern Style.

April 22, 2013

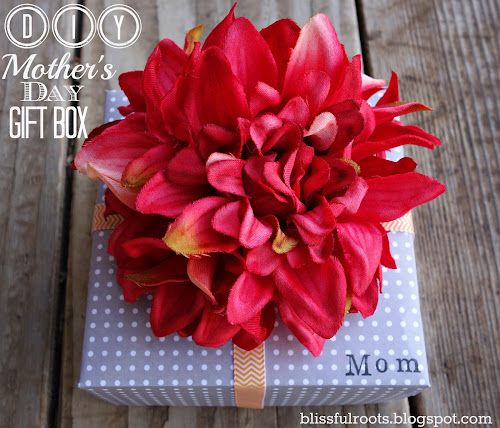
DIY Mother's Day Gift Box

With Easter in March this year, I feel like there's been a long stretch here with no holiday.  But we do have Mother's Day coming up in May, and I decided it's nice to have awhile to think about it, and get ready for it early.


I did a post on how to make your own gift boxes in December.  These cute boxes can be used for any occasion- Mother's Day especially.  If anyone deserves a dolled-up box, it's your mom.


These boxes are just the right size to hold a nice gift card, jewelry, or any other small gift you may have in mind for your mom this year. 

Make your box, add some cute ribbon, a flower, and a name to it.  Then put your gift in and fill it with some fun shredded paper.  Then get ready for the little surprise at the bottom of the box.  


I like to add a little message.  This time I added a definition of mother that I found last year, and loved.  So not only will your mom get a great gift in a darling box, but she'll have a little extra bonus in the bottom of the box.  If you attach the quote with just a bit of tape it will come right off and she can keep it somewhere she'll see it.  I love adding small, unexpected touches.

Click here for the full tutorial on how to make your DIY gift box.  These are so easy to make!  If you can fold and cut, you can  make these.  I love experimenting with different papers, ribbons, and toppers.  So many color combinations to use! 


What are some of your favorite Mother's Day gift ideas?
Thanks so much for stopping by!  I hope you found a little something worth your time.

Linking up to these parties & Savvy Southern Style.

April 19, 2013

Turn Napkins Into Scrapbook Paper {Tutorial}

Do you ever have a battle with yourself in the napkin isle?  As strange as it may sound, I can say I do.  I love cute napkins, but I hate to buy them knowing that they'll just be used to smear food around and then be thrown away.


I was in World Market a few days ago and had the battle once again.  They have so many cute summer napkins there right now, but I walked out without a single one. 
Well, how's this for coincidence, that same day my mother-in-law told me she'd found a video on YouTube about transferring napkins to card stock.  What!?  All my napkin problems were solved.  I could use napkins for more than the occasional spill.  


This is a napkin my mother-in-law found in Jackson Hole, Wyoming.  Isn't it too cute to be ruined?  I kind of think so.


And here's what the napkin looks like after transferring it to card stock.  This was a first attempt, and the edges may be a bit rough, but it is honestly one of the most amazing things I've ever seen!  The new napkin/paper is thick, durable, and has amazing texture!  It's hard to capture the difference on film, so you have to try this for yourself.  You'll be amazed!
              

Here's the YouTube video tutorial.  You're basically going to make a sandwich with two pieces of scratch paper for the bread, your napkin, Saran Wrap (this is what adheres the napkin to the paper), and your card stock as the meat and cheese.  Then you iron.  Just watch the video and you'll have no problem trying it for yourself.  


My mother-in-law also tried it with tissue paper.  It was a tab bit trickier, and she actually ended up taking the top piece of scratch paper off and just lightly ironing right on the tissue paper.  


Once again, the picture doesn't do it justice, but you can kind of see the great texture the paper has now.  Just like with transferring the napkins, I love how durable the paper is now. Tissue paper can be so cute, but it too is often just thrown away.  This way you can use it for much more (cards, banners, framed as art on the wall, just about anything).  
Stay tuned for more projects like this.  I need to head back to World Market and stock up on napkins (no more battles:)).

Thanks so much for stopping by!  I hope you found a little something worth your time.

Linking up to these parties & Savvy Southern Style.

April 18, 2013

On Market Street {Beautiful ABC Book}

I was at the library on Tuesday with my boys, and I ran across this book.  I'd kind of forgotten about this one, although I'm not sure how.  This is easily in my top five favorite ABC books.  I used it all the time in my first grade classroom, and I've read it to my twins, but it's been awhile.


This book is written by Arnold Lobel (the author of all the Frog & Toad books), and illustrated by his wife Anita.  She does most of the work for this book, because it's almost wordless.  She is an amazing artist!  I never get tired of looking at these pictures!


Amazing, right?  There's 20 more letters in the book.  That was just a little sneak peak.  I love the creativity here.  Did you notice the Frog & Toad puppets on the letter 'T'?  So clever! 
  
If you don't own this book, (like me, but I'll be buying it tomorrow) then I'd strongly suggest you add it to your library.  You can buy it on Amazon for just about $5.  
Oh, and thanks to Once Upon A Bookshelf (what a cute name!) for the great images of On Market Street.

Thanks so much for stopping by!  I hope you found a little something worth your time.

Linking up to these parties & Savvy Southern Style.

April 17, 2013

Homemade Triple Berry Jam

I'm kind of spoiled in that I've grown up on homemade jam, and only on a few occasions have I actually bought jam from the store.  There's really no comparison.  You just can't beat homemade jam!  


And guess what?  It's really easy to make.   It might sound daunting, but it's not bad at all.  My recommendation is to get a few sisters or friends together and have a jam making day.  Many hands make light work, right?  I have done jam on my own before, and it's never been a bad experience, but it's easier, quicker, and of course more fun with a group!


My mom, my sister, and I love to make jam when we get together.  Last year we started making the triple berry jam found in the recipes that come in the Sure-Jell (pectin) box.  I have to say I haven't made any other kind of jam since.  I do love a plain strawberry or raspberry jam, and I hope to make more peach jam this fall, but the triple berry jam is my favorite!  I love the flavor of all the berries (strawberries, raspberries, and blackberries).

You can find the recipe by clicking here.  Like I said, it's really easy.  You just need to wash and crush all your berries, put them in a pot with pectin, boil it (use a tall pot for this- the boiling gets a bit rigorous, and splashing often occurs), add the sugar, then boil again.  That's just about it.  The recipe does have you process the jam after you've filled your jars and put the lids on.  We've never done this step.  In fact, when we read the instructions last year we were a bit surprised to find out we should have been doing it all along.  We figured we've been eating non-processed jam our whole lives and haven't died yet, so we're probably okay.  I'm not saying you shouldn't, (and maybe you should just so I don't get in trouble for telling you not to) I'm just saying that's how we've always done it.  

 We use fresh strawberries for this jam , but the raspberries and blackberries work fine even if you use the frozen ones. They're a lot less expensive frozen, and I can't really tell that much of a difference between the fresh and the frozen.  


And what's a delicious jar of jam without a cute fabric topper and label?  Well, I guess it still is a delicious jar of jam, but not half as cute sitting on your shelf.


Thanks so much for stopping by!  I hope you found a little something worth your time.

Linking up to these parties & Savvy Southern Style.

April 16, 2013

April Showers Chalkboard Printable

We woke up to six inches of snow here in Midway yesterday morning, so I needed a positive quote to help me make it through the day.  I guess snow showers count as showers, right?  The snow was gorgeous, and it was all melted before the day was done, but I prefer rains showers this time of year as opposed to snow showers.


I do love the May flowers, so I guess I need to appreciate the showers (in snow or any other form).  Just click on the quote to print your own copy.  
Thanks so much for stopping by!  I hope you found a little something worth your time.

Linking up to these parties & Savvy Southern Style.

April 15, 2013

Setting Up You Baby Chick's Nursery {The Brooder}

Like I mentioned in my Friday post, we got some baby chicks this weekend.  They are proving to be as delightful as I'd hoped.  We (myself, my three boys, and my husband) can't get enough of them!  My very energetic boys have all turned into little gentle parents.  They worry about the chicks and take such good care of them.  It's been such a joy to watch them!


This picture was taken before we had our brooder set up.  Our chicks normally aren't out on the grass all alone.

Raising your own chickens does seems to be all the rage these days, so maybe a lot of you already know how to set up a brooder.  If that word is totally foreign to you, (don't worry, up until five days ago it was to me) then keep reading.  I'm no expert, but I have read a lot of chicken material over the past few days, and here's what I've learned.


The brooder is your baby chicks' first home (think of it as a  nursery).  They will need to spend the first six to eight weeks of their lives here.  I was all excited to have my husband start on our coop, but we won't be needing that for about another month.  It will need to be build, however and I can't wait!


The actual container used for your brooder may vary.  There are commercial ones you can purchase, but after reading through some of our chicken books, we decided on a large Rubbermaid storage bin.  It's tall on the sides (so the chicks can't flap out as they grow) and because it's plastic, it's easy to hose out and wash when it needs cleaned (every 3 days or so is recommended).
Source:  Rubbermaid

Besides a container, you'll also need the following.


You can use a white or red bulb for your brooder.  We found a 250-watt white bulb for less than a red one, so we went with that.  I did read that the red light can be more gentle and natural for the chicks, and I'm sure they'd be great.  Our white one seems to be working just fine for us.
Your bulb will need to screw into a direct wire heat lamp with a ceramic base. 

Source: Fleming Outdoors


This is where you'll keep the chick's food.  We bought Purina's Start & Grow (medicated) for our little ones.


Source:  Fleming Outdoors


This is where the water will go for the chicks.  I did read you can put marbles in the bottom of the water because the chicks like shiny things and it can prevent drowning sometimes.  We don't have marbles in our water, and so far so good.


Source:  Fleming Outdoors


We went with a pine shaving bedding for our chicks.   It's the same stuff you'd put in a rabbit or hamster cage.


Source: Amazon


Your brooder will need to be 95 degrees Fahrenheit for the first week, and then decreased in five degree intervals every week after that.  A thermometer will help you keep track of the brooder temperature. 

Source:  Acurite              
That's about it.  I would recommend having your brooder all ready to go before picking up your chicks.  We didn't, and it wasn't terrible, but it would have been nice to have the set up all done with before hand.

I got my information from this book (click on the book image for more information).


I've almost read it cover to cover.  I don't think I ever thought I'd read an entire book about raising chickens.  It's really quite enjoyable!  I'm excited to read and learn more.

Well, I hope that made you excited to go out and buy some baby chicks.  It's really easy to get ready for them, and they will be a tremendous source of entertainment for you and your family!  Thanks so much for stopping by!  I hope you found a little something worth your time.

Linking up to these parties & Savvy Southern Style.